Planting Guide for Shrubs, Trees and Potted Plants of all kinds
Whenever I think of planting, I am reminded of a movie I once saw in which a man was hovering over a tomato plant with fertilizers, sprays, and soil testing meters at hand, cursing, "Grow damn you!"
The unfortunate plant, which was the object of his attention, was wilting and had black spots all over the few green leaves that weren't brown. And of course, his loving, supportive wife was standing behind him making helpful comments, "Some Italian, he can't even grow one stinking tomato plant. My father grows hundreds every year!"
Some people, it seems, can make anything grow. If they were to stick their shovel upside down in the ground it would sprout roots and leaves for them. For the rest of us mortals, those who must work at it to get things to grow, just a bit of advice can make the difference between a successful planting or a disaster of dead stems and leaves.
What are the secrets of successful planting?
Do I need to follow carefully laid out steps to ensure my plants will live when I plant them?
Or can I simply dig a hole, put my new plant in it, mulch, water, and fertilize it a little and walk away?
Believe it or not the answer to that second question is yes, but only if you know the subsurface drainage is adequate, the soil contains enough organic matter, and you plan to come back to check on it at regular intervals to ensure the moisture level is correct.
Also, unlike a tomato plant that will thrive even if it's partially buried, it is necessary to be sure that you don't plant too deep. Generally, if you plant too deep you may as well say a farewell prayer over your unfortunate plant because it will likely die, sooner rather than later.
The answer to the first question is no, you don't need to follow a series of steps. All you need to do is observe the rules. Most plants do not grow well with wet feet. Which means that unlike Louisiana Iris or Bald Cypress trees they will not thrive if their roots never have a chance to dry out a bit.
Subsurface drainage:
If you are planning to plant in an area where other established plants are growing well you should be able to feel confident that a new planting in the same area will do just as well. However if you are planting a new area or perhaps an area that looks to be lower than the surrounding ground you might want to check to be sure the subsurface drainage is adequate.
Check the drainage by digging a small hole (a foot deep is plenty) then fill it water. Check to see how long it takes for the water to drain away into the ground. If it takes much longer than a few hours then you may have a drainage problem which will force you to either choose another planting area or raise the plants higher than the surrounding ground by planting in a raised bed or a row.
Organic Matter:
Most nurseries, especially in the southeastern states, grow their container plants either in peat moss mix or in a mix primarily composed of composted pine bark. Both peat moss and composted pine bark are high in organic matter that plants require to thrive. And both can be used as a soil amendment when planting shrubs and trees in the ground. However if you have a compost pile you can use the partially decomposed organic matter (leaf mold) from it instead.
The general rule for soil amendment is: If you have primarily sandy soil you should use either peat moss or leaf mold compost as your soil amendment. However if you have primarily clay soil you should use a more coarse soil amendment such as composted pine bark.
Whatever you use be sure that the organic matter is at least partially decomposed. Using raw or un-composted organic matter will use up nitrogen in the process of decomposition robbing it from the plant. In addition the composting process creates enough heat that could damage plant roots. If the organic matter you use for soil amendment is not composted your plants will have yellow leaves at the least or dead brown ones at the worst.
Planting:
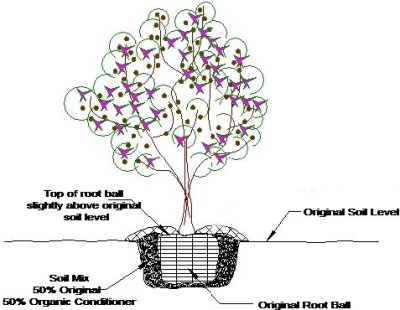
The general rule is to dig the hole about twice as wide as the root ball of the plant and just a little bit deeper. If you have heavy clay soil you should dig the hole one and one half times the depth of the root ball and backfill with a mixture of compost and soil then tamp lightly.
Position the plant so that the top of the root ball is slightly higher than the surrounding ground (at least an inch or two). Straighten the plant then backfill with a mixture of soil and compost. Tamp the soil lightly to firm it around the root ball then apply your favorite mulch over the planting area. Finally, water the plant well checking to be sure there are no low spots where you may not have put enough backfill.
Important! Be sure to apply enough water to completely saturate the root ball.
Watering your new plant(s) after planting:
The most frequent cause of plant deaths (other than planting too deep or over fertilizing) is improper watering. If there is no rain after planting your new plants you should check them every day. However they may or may not need watering every day. That will mostly depend on the time of year, the weather, and the subsurface drainage. The best practice is to water when the plant needs it. If the soil underneath the mulch is dry or the plant is wilting that is usually a good indication that watering is required.
Again, when you water, be sure to water well enough to saturate the root ball.
However, do not water on a schedule whether the plant needs it or not. If the roots never get a chance to dry out your plant will simply take a little while longer to die than it would have if you had never watered it at all!
Soil conditioner or plant hormone:
There are some who recommend the application of so-called soil conditioners or plant hormones to encourage new root growth. However a less expensive solution of 20-20-20 or 20-10-20 soluble liquid fertilizer will encourage root growth also!
Fertilizer at planting:
If you wish to fertilize at planting time (a good idea) use a fertilizer that has a slow-release type of nitrogen. Timed-release fertilizers such as Osmocote or Nutricote are also great. The fertilizer can be applied either during or after the back fill but if you forget you can always top dress, even on top of the mulch. Just be careful not to wash it all away when watering.
Be careful when choosing fertilizer:
Nitrate based fertilizers release their nitrogen at a rapid rate when drenched with water. Plant roots can be damaged if nitrate fertilizer is applied directly to the top of the root ball.
This is why fertilizers such as 8-8-8 or 13-13-13 are somewhat risky to use when transplanting unless you know this and place the fertilizer well away from the root ball. If nitrate fertilizer is applied directly to the top of the root ball in sufficient quantity the plant will be damaged, possibly enough to kill it.
Slow release type fertilizers are either pelletized or chemically altered urea to render the nitrogen mainly water-insoluble. The downside is that these fertilizers are a bit more expensive than nitrate based fertilizer.
Timed-release fertilizers are usually coated to release nitrogen slowly to the plant. An added advantage to these types of fertilizers is that they last much longer, anywhere from three to twelve months, and they can be applied directly to the top of the root ball of the plant.
Be careful, even with slow-release fertilizer. If you discover that you have under fertilized you can always add more later but if you over fertilize it is difficult to remove the excess before the plant is damaged.
Caution! Do not use so-called weed and feed lawn products for pot plants, shrubs or trees. This type of fertilizer contains herbicide (usually broad-leaf selective herbicide) and will damage or possibly kill your plants.
Wounding or spreading the roots when planting:
It is not usually necessary to either wound or spread the roots when planting. If the roots are disturbed excessively the plant may die. When the weather is hot and dry is an especially bad time to do this.
However if the plant is root bound, meaning that there is a solid mass of roots with no soil showing, the roots can be wounded or spread slightly to encourage even root growth. If the roots must be spread or wounded it is usually a good idea to prune some of the top (the leaves and branches) to compensate for the root loss. Overgrown plants should be pruned before planting in any case.
Soil pH and Lime:
In general most plants will grow quite well if the soil pH is between 6.0 and 7.0 with 6.5 being almost ideal for the majority of plants. Acid loving plant such as Azaleas and Camellias prefer a slightly lower pH with 6.0 being ideal. Some plants such as Rabbit-eye Blueberries prefer the pH much lower at 4.5 to 5.5.
There is usually no problem with adding a small amount of lime to the soil at planting time since both peat moss and composted pine bark are usually low in pH.
However lime should only be added in quantity if a soil test indicates that it is needed. If lime is required to raise the soil pH be sure to use garden or dolomitic lime rather than quick lime.